How To Run Facebook Ads For Your Shopify Store
Looking to attract more customers to your Shopify products? Facebook Ads might be more powerful than you think. With just a few clicks, you can set up ads that send users directly to your Shopify store, making it easy for them to purchase instantly. This streamlined, convenient process has helped countless Shopify sellers scale their sales efficiently.
In this article, we’ll walk you through how to set up Facebook Ads specifically for your Shopify products. But first, it’s essential to understand how to connect Shopify with Facebook. We’ll cover the requirements for integration, step-by-step instructions for setting it up, and how to prepare your product catalog for Facebook promotions.
How to Connect Shopify to Facebook and Instagram
If you’re a Shopify seller, you can manage your store and run Facebook ad campaigns by integrating your Shopify account with Facebook. However, before connecting the two platforms, you must meet several requirements to ensure a smooth setup process.

Requirements to Connect
To connect your Shopify seller account with your Facebook business page, make sure the following conditions are met:
Your Shopify online store must not have password protection enabled.
You must be on the Basic Shopify plan or higher.
You need a published Facebook Business Page.
A verified Business Manager account must own your Facebook Page.
You must have admin access to that Business Manager.
These are mandatory prerequisites to guarantee proper linking between the platforms. They help prevent errors and allow all Facebook-related tools (like Ads and Pixel) to function correctly.
Steps to Connect Facebook with Shopify
Once all conditions are met, follow these steps to connect Facebook to your Shopify store:
Log in to your Shopify account.
Click on Sales Channels.
Select Facebook, then click Add App.
Click Add Sales Channel to finish installing.
Click Start Setup.
Select Connect Account and log into your Facebook account.
Follow the prompts to configure your commerce settings, ad account, and Meta Pixel.
Accept Facebook’s terms and conditions.
Click Submit to complete.
After completing the setup, your store and Facebook will be connected, enabling features like product sync, ad tracking, and campaign management.
Syncing Products Between Shopify and Facebook
To promote your Shopify products via Facebook, you need to sync your product catalog between the platforms. Here’s how:
Go to the Products section in your Shopify admin.
Filter by Sales Channel > Facebook & Instagram > Excluded.
Select the products you want to sync.
Click the three-dot menu (...) > Add to sales channel.
Make sure Facebook & Instagram is checked, then click Add Products.
Once added, your selected products will be synced with Facebook’s Commerce Manager, making them eligible for ads and shoppable posts.
Testing Facebook and Shopify Integration
Before launching any campaigns, it's critical to verify that your Shopify-Facebook integration is working properly. This ensures your Meta Pixel is correctly tracking user actions like purchases, add-to-cart events, or product views.
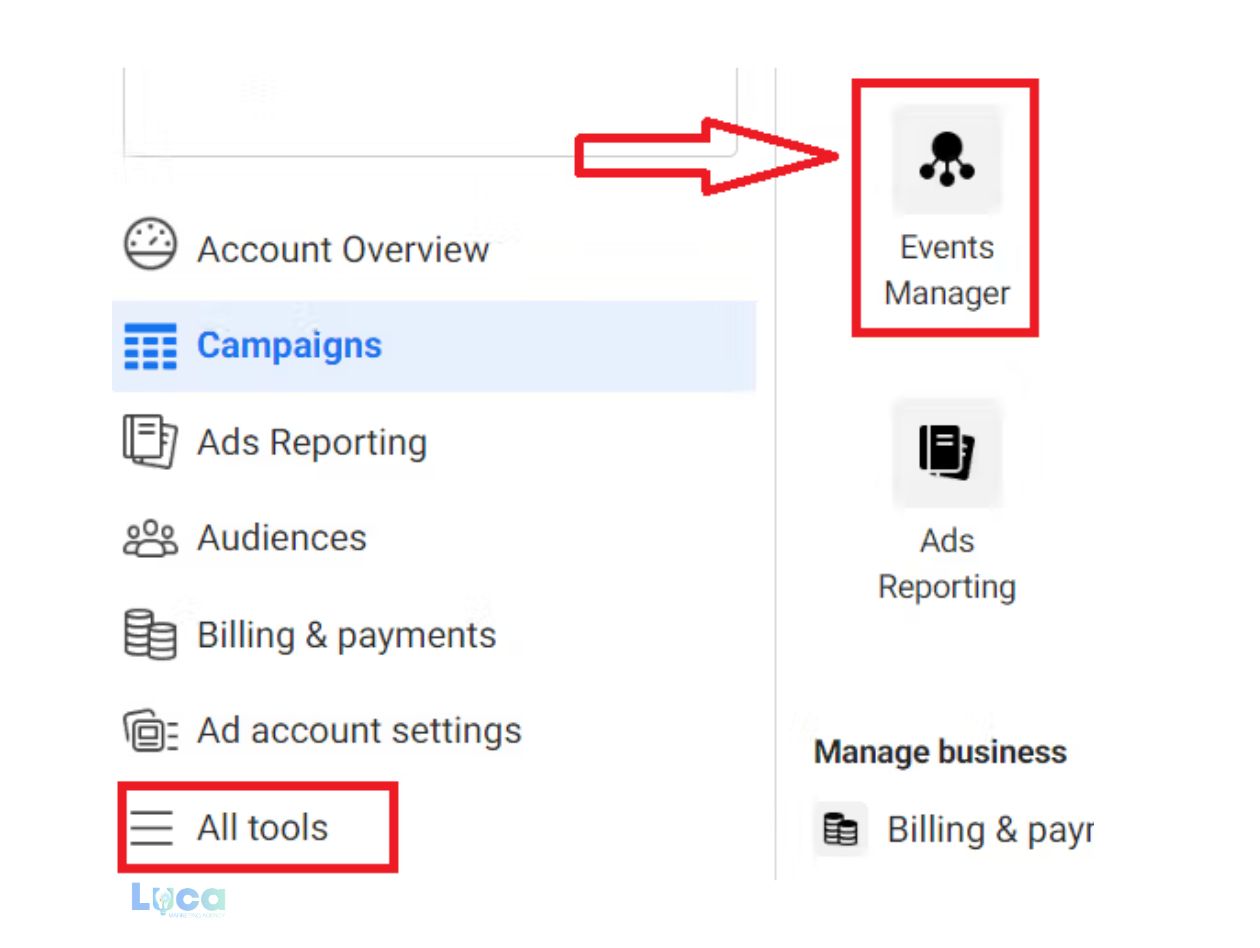
How to Check the Connection
Go to your Meta Events Manager.
Click All Tools and select Event Manager.
Click Test Events and enter your website URL.
Click Open Website.
Once your site opens, perform several test actions like visiting a product page, adding to cart, or completing a test purchase. Then return to the Test Events tab in Meta Events Manager to check whether these actions have been tracked successfully.
Sometimes integration issues may occur without any visible warning, which is why this test is an important validation step. Confirming the setup works ensures your campaigns will track conversions accurately and perform smoothly moving forward.
How to Create Facebook Ads for Your Shopify Store
Install Meta Pixel on Shopify
Before launching any Facebook Ads, the first essential step is to install the Meta Pixel to track user behavior on your Shopify store.
The pixel allows you to monitor valuable actions such as product views, add-to-cart events, checkouts, and completed purchases.
To install it, go to your Shopify admin panel, navigate to Online Store > Preferences, and paste your Pixel ID in the Facebook Pixel section, then save.
Alternatively, you can install the Facebook & Instagram by Meta app from the Shopify App Store to make integration much easier. This app also supports the setup of the Conversion API, which is vital for advanced tracking.

Choose the Right Campaign Objective
When you create a new campaign in Meta Ads Manager, you’ll need to select a clear marketing objective. This choice is crucial because it influences how Facebook optimizes and delivers your ads. If your goal is to drive direct sales, select the Sales objective. If you’re aiming to increase website visits to product pages, go with Traffic.
For building an email list or gathering customer data, choose Leads. Choosing the right campaign objective helps the algorithm work in your favor, increasing your chances of success while minimizing wasted ad spend.
Target the Right Audience
Targeting the right audience plays a major role in your Facebook Ads performance. Start by building basic targeting segments based on age, gender, location, interests, or shopping behavior.
For new stores, interest-based targeting is a good starting point. You can target audiences interested in niches like "yoga," "makeup," or "fitness." Once you gather some data, create Custom Audiences from people who have already visited your website, added items to their cart, or made a purchase.
From there, expand with Lookalike Audiences to reach new users who behave similarly to your existing customers. This approach helps you scale efficiently without compromising audience quality.
Create High-Converting Ad Creatives
Your ads need to stand out and stop users mid-scroll. Facebook offers multiple ad formats including single image, video, carousel (multi-product), and collection ads. Choose a format that best showcases your products.
When writing your ad copy, begin with a bold, attention-grabbing opening. Follow with a short, benefit-driven description that explains why the user needs your product now.
Always include a clear call-to-action like “Shop Now,” “Explore the Collection,” or “Limited-Time Offer.” If you're using video ads, make sure the first few seconds are engaging, and always add captions for viewers watching without sound.
Set Your Budget and Schedule
When it comes to ad budget, you don’t need to overspend at the beginning. Most new Shopify advertisers should start with $10–$20 per day, then monitor results over a 3–5 day period before scaling.
You can assign budgets at the ad set level or enable Campaign Budget Optimization (CBO), which allows Facebook to automatically allocate your budget to the best-performing ad sets.
Regular monitoring and adjustments will help you control your costs and increase your Return on Ad Spend (ROAS) over time.
Conclusion
Facebook Ads remain one of the most powerful tools for growing a Shopify store. However, true success doesn’t come just from launching ads it comes from doing it strategically. Start with proper Pixel and event tracking setup, choose the right campaign objective, target relevant audiences, create strong ad creatives, and monitor performance carefully.
Don't forget to optimize your web events so you don’t lose valuable data. And if you’re looking to scale further, consider expanding into affiliate marketing to reach more customers through trusted promoters. You can learn more in this article on affiliate marketing for Facebook.
Author
With over a decade of experience in advertising, we specialize in providing high-quality ad accounts and expert solutions for ad campaign-related issues.
Discussion (0)
Table of contents
Hot topics
How Much Do Facebook Ads Cost
Nov 17, 2023
How To Create A TikTok Business Account: A Complete Guide
Dec 29, 2023
Related posts
How Much Do Facebook Ads Cost
Nov 17, 2023
Latest Facebook ad size 2024
Nov 30, 2023
Quick way to increase Facebook ad account spending limit successfully
Nov 30, 2023
Get in touch with us
Hotline
+84 398 451 231Email Support
support@lucagency.netAdress
My Dinh - Ha Noi - Viet Nam